Share from your device to the big screen instantly with KLIK, even without installing an app! KLIK offers AirPlay & Google Cast compatibility, optional KLIKLink plug-and-play adapters, and the unified KLIKConnect app for the ultimate in features, performance and ease-of-use.
Use any graphics editing software, from Microsoft Paint to Adobe Photoshop, and everything in-between.
Get the HUB Standby Customization Templates here.
Use the templates to align the safe area, then add your images, logos and text, filling the screen.
Create a second version of your design with the Moderator logo places as shown in the Moderator template.
Now save both images to a USB thumb drive inside a folder named “themes”, and plug into the HUB.
Open the HUB settings menu from the daisy, select Themes and follow the prompts to upload your creations.
Now select your new theme and enjoy the results.
Great question, so let’s start at the very beginning. Themes are what we call customized HUB screens displayed when not in use for collaboration. The default theme is displayed on the screen when you start a HUB for the first time and looks like this:

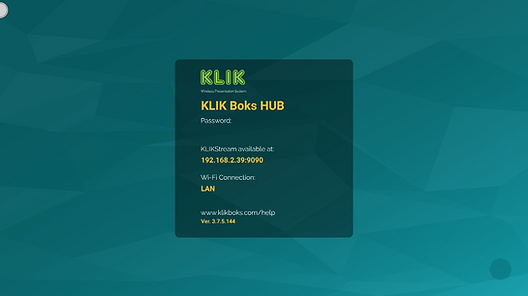
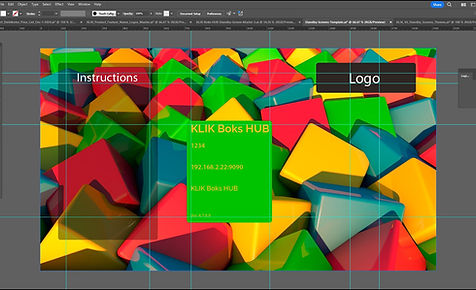
We call these “Standby Screens”, but you can also call them wallpapers or desktops. Whatever you call them, there are two main components to a standby screen; 1) the background graphics, and 2) the dynamic information, displayed here in amber (the action area).
The purpose of the standby screen is threefold:
Indicates that the device is powered on and working.
Displays information about the specific device.
Fills the screen with something attractive to look at.

HUB comes with two different standby screens by default, although it might be difficult to tell them apart if they’re not shown side by side. If you look closely at the second image, you’ll notice the addition of an icon in the top-right of the action area. That’s the Moderator icon, and it appears whenever the HUB is used in Moderator Mode. Find out more about Moderator Mode here.
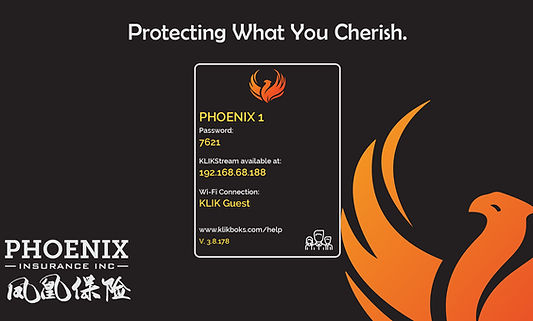
While the default standby screens that come preinstalled on the HUB use exactly the same layout and background graphics, with only the addition of the Moderator icon, they can be completely different. The only thing that needs to remain the same on both screens is the placement of the dynamic content in the action area. Remember, aside from this dynamic content, everything else is editable. Here’s an example of a customized Moderator screen, with the icon in the bottom:

It’s important to note that the Default Standby screen and the Moderator Standby screen can be completely different, if that’s your preference, or exactly the same, if that works best.
Here are some instances to consider:
Add operating instructions to the Default screen so new users can easily use the KLIK.
Add a message explaining how Moderator mode works when it is enabled.
Get a lot more creative with your selections, messages and graphics.
Now that you know all about standby screens, let’s move on to themes. A theme is merely the combination of Default and Moderator screens under one definition. So, you could have a Standard theme that contains your preferred combination of standby screens, and a Holiday version of those standby screens. Or, one for each instructor, either exactly the same as the standard versions, or with the addition of the instructor’s name and photo.
HUB supports multiple themes, so once created, they can be stored onboard the device. Changing themes is simple, and can be done right from the HUB, using a mouse and the screen to select a new theme.
It doesn’t take a lot of imagination to envision the many variations of standby screens that can be created and deployed for special occasions or everyday use.
Making a new theme is as simple as copying an existing image (PNG or JPG) to a thumb drive. Or, you can use any photo editing or illustration software to make very complex and powerful themes. Here’s a simple exercise that can help get you started. For seasoned graphics pros, skip down to step 4 for the essentials.
Depending on your computing platform you’ll have some sort of image editing software app already installed. Mac OS users have the Photos app, while Windows comes with their Paint app preinstalled. Other platforms come with their own apps installed or available for free as a download. It is recommended that you use either a preinstalled app or one from a reputable aftermarket publisher.
For the best results, you should use an app that supports Layers. This type of application allows different images and components to be “stacked” over top of one another into layers. They also allow you to reveal all or parts of the underlying image, either by creating masks or adjusting opacity. If that sounds too complicated skip it and let’s just create a simpler standby screen.
Now gather all of the assets you’ll need to put together a new standby screen. These include background images, logos, text, fonts, and stock graphics. There are plenty of free resources online, and your organization likely already has several components available in a stock library. Please respect copyrights and do not use design elements without approval, even though you’re able to copy them from the Internet.
Once all assets are collected, you’re ready to start. Open a new file sized to 1920×1080 pixels as your artboard. Download the HUB Standby Customization Templates here and unzip the archive to reveal three files. Use the two full-screen images as your base layers for positioning and the third file, the Moderator Icon, on your Moderator screen. Note that the action area is outlined, so make sure that the background in that area offers sufficient contrast for the dynamic content shown in amber.
Create the two separate files for Default and Moderator screens, then copy both to a USB flash drive into a folder at the root of the drive (/theme). Insert the drive into the HUB, open the settings screen and click on Theme, then select Add to scan the USB drive and select the files. Add a name for your new theme, apply it and save the settings.
Now that you’ve installed a custom theme, it can be applied as needed by simply selecting it from the theme menu.
Unfortunately we do not offer standby screen customization services. For those who do not have a graphics design team inside their organization we generally recommend using a contractor you already know such as a web developer, advertising designer, or other qualified person. In addition, sites such as Fiverr and other creative gig hiring sites can usually help. Just make sure you gather all of your existing digital assets in advance and have some idea of what you’re looking for in and end product to share with your designed.
Oh, and once you’ve built your masterpiece, you can share it with us, so we can feature it in our blog!